============================GIT================================
Git是一个免费且开源的版本管理系统。
一、常用命令记录(2.16.2.windows.1):
1、新建分支:
git checkout -b dev-complex
2、修改本地分支名称:
git branch -m release-0517-delDistributeRcord release-0517-forbidCategory
3、 查看所有分支,包括远程:
git branch -a # 若本地没有想要的分支则:git fetch
4、删除分支:
git push origin --delete 分支名(不用带remotes) #删除远程分支
git branch -d 分支名(不带路径) #删除本地分支
5、git后悔药
5.1 返回修改之前的状态,丢弃所有修改
git checkout .  # 修改的
git clean -df   # 一些新增的
5.2 已经commit提交,没有push,撤销commit(还保留修改)
git reset --soft HEAD^
HEAD^的意思是上一个版本,也可以写成HEAD~1,如果你进行了2次commit,想都撤回,可以使用HEAD~2
5.3 将已经push到github的文件删除, 但本地的文件不删除
git rm -r --cached .vscode # 将文件夹从暂存区中删除
git commit -m 'delete .vscode config' # 将修改后的暂存区合并到HEAD中
git push origin master # 推到远端
5.4 回退版本(命令方式)
git log 查询提交日志sha码 (git reflog 版本号的)
git reset --hard HEAD^ 回退到上一个版本  HEAD~3 推到3次提交前
git reset --hard sha码或版本号  回退到指定的版本
git push origin master --force  强制推到远程,替换
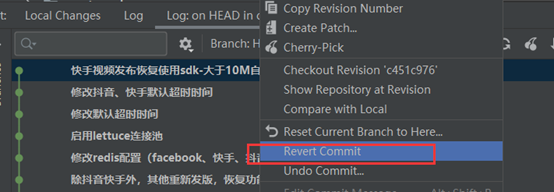
回退版本(在IDEA中)
选中回退的记录,使用Revert
5.5 强制覆盖本地代码)
git fetch --all
git reset --hard origin/master
git pull
6、修改远程推送地址:
git remote -v  # 查看当前分支
git remote set-url origin https://host..xxxxx.git  #设置
6.1git迁移后
进入项目目录
rm -rf .git
git init
git remote add origin https://test/test/test.git
git add .
git commit -m "Initial commit"
git push -u origin master
7、查看提交历史
git log --stat  #每次修改的文件列表, 及文件修改的统计
git log --name-status #每次修改的文件列表, 显示状态
git log --name-only #每次修改的文件列表
git whatchanged #每次修改的文件列表
git whatchanged --stat #每次修改的文件列表, 及文件修改的统计
git show #显示最后一次的文件改变的具体内容
git show -5 #显示最后 5 次的文件改变的具体内容
git show commitid #显示某个 commitid 改变的具体内容
8、移除版本控制
执行 git rm -r --cached  "bin/"     #删除文件的命令.
执行 git commit -m" 删除bin文件"    #提交,并加注释
执行 git push origin master      #提交到远程服务器
9、强制更新依赖
mvn clean install -e -U
10、git开发错分支,改完代码了才发现没切换分支(改在了master上)
已经commit了:
git reset --soft HEAD^ // 撤销最近一次commit操作,另一种:git reset --soft HEAD~1 如果两次commit改成2。此操作不会删除开发的代码
//其他说明: --mixed 不删除工作空间改动代码,撤销commit,并且撤销git add . 操作
// --soft  不删除工作空间改动代码,撤销commit,不撤销git add .
// --hard  删除工作空间改动代码,撤销commit,撤销git add .
git stash // 暂存代码,提到git暂存栈
git checkout -b release-20191028 // 加-b 在当前分支切出开发分支,或者直接切到应该的开发分支
git stash pop // 从暂存栈中拉出代码
完成
11、git commit提交后修改注释
git commit --amend
12、查看指定分支从哪儿切出来的
git reflog --date=local|grep 分支名
13、从其他仓库拉取分支
⑴ 查看当前远程仓库
git remote 或 git remote -v
⑵ 添加新的远程仓库
git remote add B(自己命名的仓库名称)
#再次查看,这时应该已经有新加入的仓库信息了
git remote -v
⑶ 获取仓库B中的分支信息
git fetch B(2中的仓库名称)
⑷ 新增一个当前分支做测试
git checkout -b test
⑸ 将B上的分支合并过来
git merge B/feature/xxxBranch
14、还原当前分支代码,清除未track的代码(https://blog.csdn.net/zzk220106/article/details/108639056)
git checkout -f && git clean -df 或 git reset --hard && git clean -df
15、git从其他分支,合并某个指定的commit记录
首先在A分支上git log获取到提交号;然后git checkout B切换分支,然后
git cherry-pick xxxx号 #如果有冲突会提示
============================GitLab================================
GitLab是一个开源的代码仓库管理系统,可以使用基于web的服务管理资源,结合GitLab Runner构建持续集成环境。
基于版本:10.1.3【说明:GitLab的社区十分活跃,其版本迭代非常快。本文开始使用8.7.5版本。如果版本跨度比较大,本文不保证兼容性】
一、配置及命令记录:
1、修改配置:
sudo -e /etc/gitlab/gitlab.rb  #gitlab的配置在此脚本中修改
sudo gitlab-ctl reconfigure  #根据脚本重新配置gitlab(以上修改会生效)

sudo gitlab-ctl tail #可以查看日志
sudo gitlab-ctl restart nginx #重启nginx
2、gitlab10.6.1修改服务ip地址(文件:/etc/gitlab/gitlab.rb)
## GitLab URL
##! URL on which GitLab will be reachable.
##! For more details on configuring external_url see:
##! https://docs.gitlab.com/omnibus/settings/configuration.html#configuring-the-external-url-for-gitlab
external_url 'http://101233.iask.in:10943'
改过gitlab.rb后执行如下命令
gitlab-ctl reconfigure
gitlab-ctl restart
3、配置ci-runner持续集成环境(2017年11月11日 操作系统CentOS6)
安装runner:
wget https://packages.gitlab.com/install/repositories/runner/gitlab-runner/script.rpm.sh
sudo bash
sudo yum install gitlab-runner
配置runner
①注册runner:
sudo gitlab-runner register
②输入Gitlab实例URL
Please enter the gitlab-ci coordinator URL (e.g. https://gitlab.com )
https://gitlab.com
③输入Token
Please enter the gitlab-ci token for this runner
xxx
④输入对runner的描述信息
Please enter the gitlab-ci description for this runner
[hostame] my-runner
⑤输入tags
Please enter the gitlab-ci tags for this runner (comma separated):
my-tag,another-tag
⑥
Whether to run untagged jobs [true/false]:
[false]: true
⑦
Whether to lock Runner to current project [true/false]:
[true]: true
⑧
Please enter the executor: ssh, docker+machine, docker-ssh+machine, kubernetes, docker, parallels, virtualbox, docker-ssh, shell:
shell
4、GitLab升级至最新版本(2017年11月14日,升级到10.1.3企业版):
①备份
sudo gitlab-rake gitlab:backup:create STRATEGY=copy
数据备份到:/var/opt/gitlab/backups
②开始升级GitLab【此步要注意更新下yum源,并且使用root权限用户,我一开始没有注意,导致升级失败,无法使用了】
sudo yum install -y gitlab-ce
二、遇到的问题及解决方案
1、gitlab ci-runner自动部署配置时无法ssh到目标主机(需要配置免密登录)。异常信息如下:
[INFO] ------------------------------------------------------------------------
$ ssh $SERVER_ADDR "if [ ! -d $BACKUP_HOME ]; then mkdir -p $BACKUP_HOME; else echo backup dir is exist ; fi "
Host key verification failed.
ERROR: Job failed: exit status 1
解决:
现在想用新搭建的Runner服务器,部署百度云上的线上服务器Yun
需要配置Runner服务器免密登陆Yun
【注意】设置免密登陆时,要使用gitlab-runner用户,这是gitlab ci使用的用户
①Runner机器操作:生成公钥、私钥对
ssh-keygen -t rsa
一路回车
②登陆到Yun服务器,生成公钥、私钥对
ssh -keygen -t rsa -P ''
三次回车
此时会在用户目录下生成.ssh目录(隐藏目录),.ssh下有id_rsa和id_rsa.pub
③把Yun机下的id_rsa.pub复制到Runner机器下,放在Runner机的.ssh/authorized_keys文件里
如果Runner机器没有.ssh和authorized_keys文件则创建这个文件夹和文件
④还是在Runner机器上,把id_rsa.pub 传到Yun服务器
scp id_rsa.pub xxx@ip:/user
⑤登录到Yun服务器上,执行:
cat id_rsa.pub >> .ssh/authorized_keys
chmod 600 .ssh/authorized_keys
然后测试一下,能用ssh 无密码登陆了
====补充@2021-06-04
ssh-keygen -t rsa 生成秘钥后,发送到目标机器:ssh-copy-id inews@192.xx.xx.xx
然后,到gitlab ci配置私钥为变量,.gitlab-ci.yml中:
: &- eval $(ssh-agent -s)
  - echo "$SSH_PRIVATE_KEY" | tr -d '\r' | ssh-add - > /dev/null
  - mkdir -p ~/.ssh
  - echo -e "Host *\n\tStrictHostKeyChecking no\n\n" > ~/.ssh/config
  - mkdir -p ~/.ssh
  - chmod 700 ~/.ssh
  - echo "$SERVER1_HOST" > ~/.ssh/known_hosts
  - echo "$SERVER2_HOST" > ~/.ssh/known_hosts
  - chmod 644 ~/.ssh/known_hosts
然后再deploy时,加入:
:
  - *
2、新配置的ci-runner不执行:(2018年11月14日)
CentOS release 6.9 (Final) 、GitLab Community Edition 10.6.1 166d2ce 、git版本:git version 1.7.1
显示如下错误信息
fatal: HTTP request failed
ERROR: Job failed: exit status 1
原因:ci-runner并未运行,
执行:sudo gitlab-runner --debug run
Running with gitlab-runner 11.4.2 (cf91d5e1)
  on my-runner 85f58823
Using Shell executor...
Running on centoshost...
Cloning repository...
Initialized empty Git repository in /root/builds/85f58823/0/dispacenet/dispace/.git/
Checking out b9acaa05 as master...
Skipping Git submodules setup
$ echo "buid start ..."
buid start ...
$ uname -a
Linux centoshost 2.6.32-696.30.1.el6.x86_64 #1 SMP Tue May 22 03:28:18 UTC 2018 x86_64 x86_64 x86_64 GNU/Linux
$ export PATH=$JAVA_HOME/bin:$MVN_HOME/bin:$PATH
$ java -version
java version "1.7.0_79"
Java(TM) SE Runtime Environment (build 1.7.0_79-b15)
Java HotSpot(TM) 64-Bit Server VM (build 24.79-b02, mixed mode)
$ pwd
/root/builds/85f58823/0/dispacenet/dispace
$ mvn clean package -Pproduct -Dmaven.test.skip -U
[INFO] Scanning for projects...
[INFO]
[INFO] ------------------------------------------------------------------------
[INFO] Building dispace Maven Webapp 1.0-SNAPSHOT
[INFO] ------------------------------------------------------------------------
Downloading: https://repo.maven.apache.org/maven2/org/springframework/spring-test/4.3.17.RELEASE/spring-test-4.3.17.RELEASE.pom
Downloading: https://repo.maven.apache.org/maven2/org/springframework/spring-core/4.3.17.RELEASE/spring-core-4.3.17.RELEASE.pom
Downloading: https://repo.maven.apache.org/maven2/org/springframework/spring-beans/4.3.17.RELEASE/spring-beans-4.3.17.RELEASE.pom
Downloading: https://repo.maven.apache.org/maven2/org/springframework/spring-context/4.3.17.RELEASE/spring-context-4.3.17.RELEASE.pom
Downloading: https://repo.maven.apache.org/maven2/org/springframework/spring-context-support/4.3.17.RELEASE/spring-context-support-4.3.17.RELEASE.pom
Downloading: https://repo.maven.apache.org/maven2/org/springframework/spring-web/4.3.17.RELEASE/spring-web-4.3.17.RELEASE.pom
Downloading: https://repo.maven.apache.org/maven2/org/springframework/spring-webmvc/4.3.17.RELEASE/spring-webmvc-4.3.17.RELEASE.pom
Downloading: https://repo.maven.apache.org/maven2/com/fasterxml/jackson/core/jackson-core/2.7.4/jackson-core-2.7.4.pom
Downloading: https://repo.maven.apache.org/maven2/com/fasterxml/jackson/core/jackson-databind/2.7.4/jackson-databind-2.7.4.pom
Downloading: https://repo.maven.apache.org/maven2/com/fasterxml/jackson/core/jackson-annotations/2.7.4/jackson-annotations-2.7.4.pom
Downloading: https://repo.maven.apache.org/maven2/net/sf/ehcache/ehcache/2.8.3/ehcache-2.8.3.pom
Downloading: https://repo.maven.apache.org/maven2/net/coobird/thumbnailator/0.4.8/thumbnailator-0.4.8.pom
[INFO] ------------------------------------------------------------------------
[INFO] BUILD FAILURE
[INFO] ------------------------------------------------------------------------
[INFO] Total time: 18.107 s
[INFO] Finished at: 2018-11-14T17:38:48+08:00
[INFO] Final Memory: 11M/110M
[INFO] ------------------------------------------------------------------------
[ERROR] Failed to execute goal on project dispace: Could not resolve dependencies for project net.dispace:dispace:war:1.0-SNAPSHOT: Failed to collect dependencies at org.springframework:spring-test:jar:4.3.17.RELEASE: Failed to read artifact descriptor for org.springframework:spring-test:jar:4.3.17.RELEASE: Could not transfer artifact org.springframework:spring-test:pom:4.3.17.RELEASE from/to central (https://repo.maven.apache.org/maven2): Received fatal alert: protocol_version -> [Help 1]
[ERROR]
[ERROR] To see the full stack trace of the errors, re-run Maven with the -e switch.
[ERROR] Re-run Maven using the -X switch to enable full debug logging.
[ERROR]
[ERROR] For more information about the errors and possible solutions, please read the following articles:
[ERROR] [Help 1] http://cwiki.apache.org/confluence/display/MAVEN/DependencyResolutionException
ERROR: Job failed: exit status 1
发现:使用gitlab-runner run 可以正常;使用gitlab-runner start无法使用
目前解决方法是在Linux配置随机启动,单独执行启动runner的命令
--------
3、问题:CentOS 6.10 + GitLab Community Edition 10.6.1
做CI部署,运行不稳定,有时候正常运行发版(这种情况很少);大部分包错
Running with gitlab-runner 11.7.0 (8bb608ff)
   on ai 0c076607
 Using Shell executor...
 Running on centoshost...
 Cloning repository...
 Initialized empty Git repository in /home/gitlab-runner/builds/0c076607/0/dispacenet/ai/.git/
 error: Failed connect to 101233.iask.in:1080; Operation now in progress while accessing http://gitlab-ci-token:xxxxxxxxxxxxxxxxxxxx@101233.iask.in:10943/dispacenet/ai.git/info/refs

 fatal: HTTP request failed
 bash: line 57: cd: /home/gitlab-runner/builds/0c076607/0/dispacenet/ai: No such file or directory
 ERROR: Job failed: exit status 1

再次retry之后可能会正常,也可能好不了。纯看心情。。。
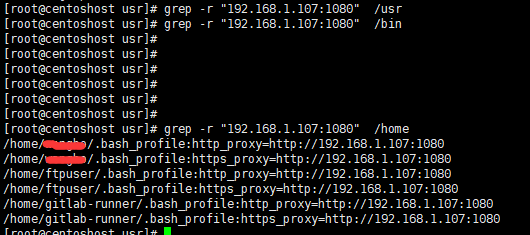
找到原因:
设置了网络代理,导致runner连不上。而且代理设置位置过多,临时用unset删除了当前的代理配置就好了。下次再打开会重新设置环境变量,又坏了!
--------
Copyright © 2015 - 2016 DISPACE.NET | 使用帮助 | 关于我们 | 投诉建议


